Installation et Configuration de l’Environnement Python
Dans ce tutoriel, nous allons vous guider à travers les étapes d’installation et de configuration de l’environnement Python sur votre ordinateur. Nous allons couvrir les deux systèmes d’exploitation les plus courants : Windows et macOS.
En réalité, vous avez 2 choix possible : Soit d’installer directement Python et d’utiliser Visual studio (Section 1) soit de télécharger Anaconda et d’utiliser les outils Jupyter ( Section 2 – mon mode préféré).
Je vous laisse ces 2 possibilités afin de pouvoir explorer basiquement python et voir comment on peut l’installer et l’utiliser.
Section 1 : Installation de Python
Installation sur Windows
- Accédez au site Web officiel de Python à l’adresse https://www.python.org/.
- Cliquez sur le bouton « Télécharger Python » pour télécharger la dernière version de Python.
- Double-cliquez sur le fichier téléchargé pour lancer l’installation.
- Sélectionnez « Ajouter Python 3.x à PATH » et cliquez sur « Installer maintenant ».
Installation sur macOS
- Accédez au site Web officiel de Python à l’adresse https://www.python.org/.
- Cliquez sur le bouton « Télécharger Python » pour télécharger la dernière version de Python.
- Double-cliquez sur le fichier téléchargé pour lancer l’installation.
- Faites glisser l’icône Python dans le dossier « Applications ».
Section 2 : Configuration de l’environnement Python
Configuration sur Windows
- Ouvrez l’invite de commande en recherchant « cmd » dans le menu Démarrer.

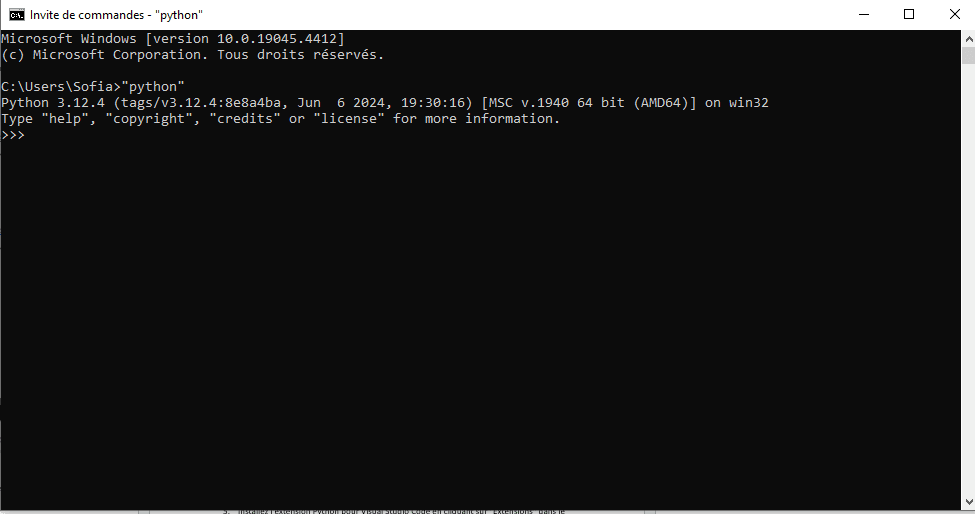
2.Tapez « python » dans la fenêtre de commande pour vérifier que Python est installé correctement.
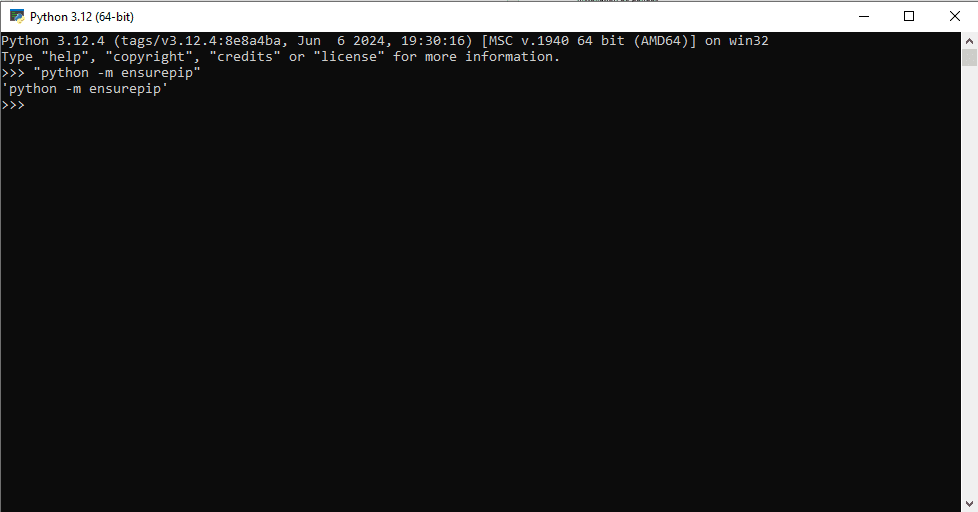
3.Installez le gestionnaire de paquets pip en tapant « python -m ensurepip » dans la fenêtre de commande.
4.Installez l’éditeur de code Visual Studio Code en allant sur le site Web https://code.visualstudio.com/ et en cliquant sur « Télécharger ».
5.Installez l’extension Python pour Visual Studio Code en cliquant sur « Extensions » dans le menu de gauche et en recherchant « Python ».
Configuration sur macOS.
- Ouvrez Terminal en recherchant « Terminal » dans Spotlight.
- Tapez « python3 » dans la fenêtre de terminal pour vérifier que Python est installé correctement.
- Installez le gestionnaire de paquets pip en tapant « sudo easy_install pip » dans la fenêtre de terminal.
- Installez l’éditeur de code Visual Studio Code en allant sur le site Web https://code.visualstudio.com/ et en cliquant sur « Télécharger ».
- Installez l’extension Python pour Visual Studio Code en cliquant sur « Extensions » dans le menu de gauche et en recherchant « Python ».
- Conclusion : Félicitations, vous avez installé et configuré avec succès l’environnement Python sur votre ordinateur. Vous êtes maintenant prêt à commencer à coder en Python !
Section 2 : Une interface encore plus simple que je recommande d’installer pour coder sur Python ( et accessible aux débutantsà: Anaconda.
1. Téléchargement de l’installeur : Rendez-vous sur le site officiel d’Anaconda à l’adresse https://www.anaconda.com/products/distribution.
- Choix de la version : Téléchargez la version appropriée d’Anaconda pour votre système d’exploitation. Pour Windows, vous pouvez choisir entre la version pour 64-bit et 32-bit.
- Exécution de l’installeur : Une fois le téléchargement terminé, double-cliquez sur le fichier téléchargé pour lancer l’installation.
- Acceptation des termes : Suivez les instructions à l’écran pour accepter les termes du contrat de licence.
- Choix du répertoire d’installation : Choisissez le répertoire d’installation d’Anaconda ou laissez-le tel quel (par défaut).
- Configuration des options : Vous pouvez choisir d’ajouter Anaconda au PATH de Windows et d’associer les fichiers .py à Anaconda si vous le souhaitez.
- Installation : Cliquez sur le bouton « Install » pour démarrer l’installation. Cela peut prendre quelques minutes.
- Terminer l’installation : Une fois l’installation terminée, vous verrez un écran de confirmation. Cliquez sur « Next » pour terminer.
- Vérification de l’installation : Ouvrez une invite de commandes (cmd) et tapez conda –version pour vérifier que Conda a été installé avec succès.
Étapes pour l’installation sur macOS et Linux
Les étapes sont similaires à celles pour Windows, mais vous devez télécharger la version appropriée pour macOS ou Linux à partir du site officiel d’Anaconda.
Utilisation d’Anaconda
Après avoir installé Anaconda, vous pouvez lancer l’application Anaconda Navigator pour explorer et gérer les environnements, les packages, et les applications disponibles.
- Lancement d’Anaconda Navigator : Recherchez « Anaconda Navigator » dans le menu de démarrage (sur Windows) ou lancez-le à partir du terminal (sur macOS ou Linux).
- Exploration des environnements : Dans Anaconda Navigator, vous pouvez créer, cloner, supprimer et gérer des environnements virtuels pour vos projets.
- Installation de packages : Vous pouvez installer de nouveaux packages Python ou R à partir de l’onglet « Environments » dans Anaconda Navigator, ou en utilisant la ligne de commande avec Conda ou pip.
- Lancement de Jupyter Notebook : Anaconda inclut Jupyter Notebook, un environnement interactif pour l’exécution de code Python et l’affichage de visualisations. Vous pouvez le lancer depuis l’onglet « Home » dans Anaconda Navigator.
Commencer à coder avec Anaconda et Jupyter :
Pour aller sur Python avec Anaconda : utilisez Jupyter notebook ou JyputerLab .
– Sur Jupyterlab : vous trouverez immédiatement la console python afin de commencer les installation de Panda, Numpy ou encore Matplotlib et afin de coder :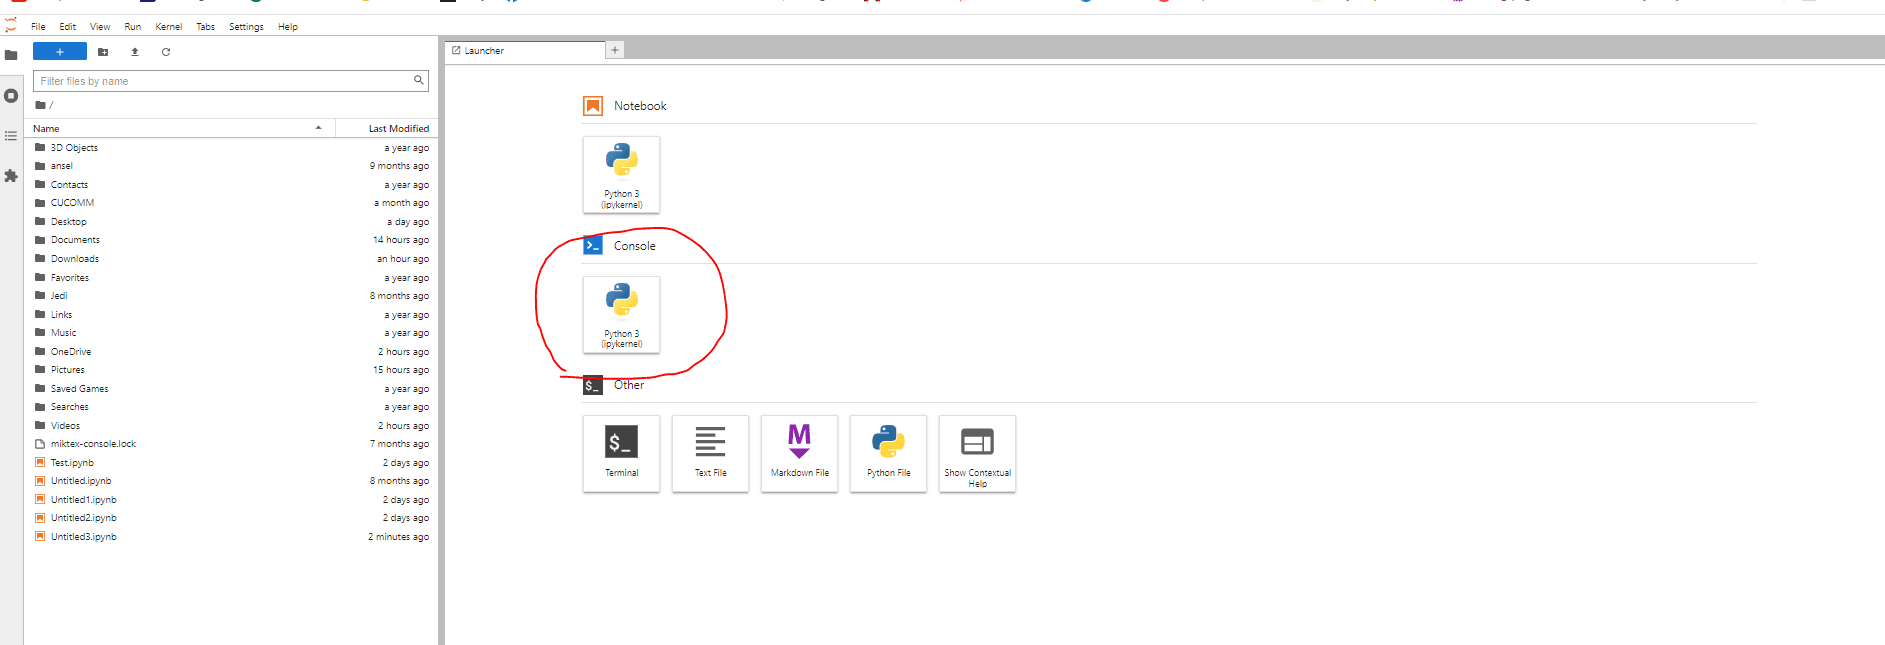
– Sur Jupyter Notebook : Cliquez sur NEW puis sur Python 3 (Ipykernel), et après vous êtes prêt pour installer vos packages et pour coder:
3 – Introduction à pandas et numpy
Section 1 : Introduction à numpy
– Qu’est-ce que numpy ?
- numpy est une bibliothèque Python pour le calcul numérique.
- numpy fournit des types de données et des fonctions pour le calcul numérique efficace.
- numpy est utilisé pour la manipulation de tableaux multidimensionnels.
– Installation de numpy
- numpy est inclus dans la plupart des distributions Python, y compris Anaconda.
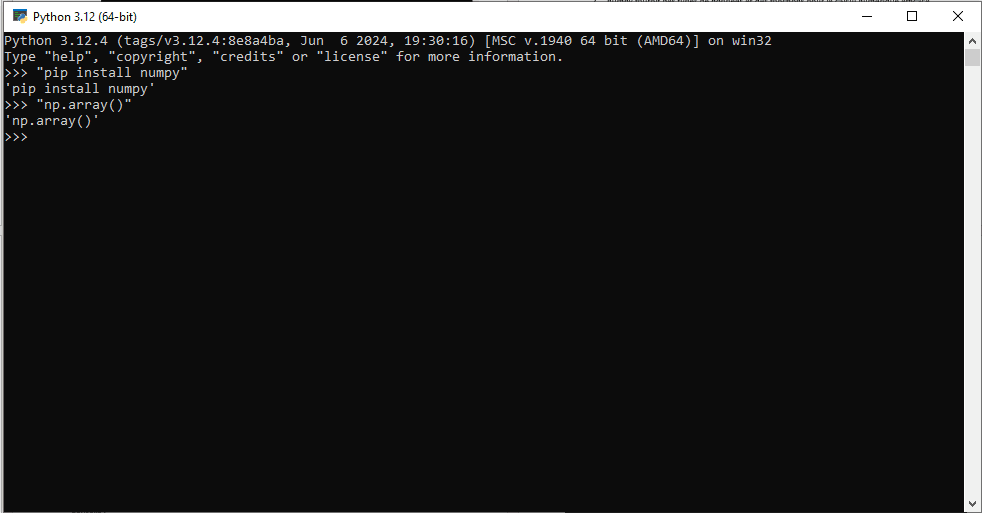
- Pour installer numpy avec pip, tapez « pip install numpy » dans la fenêtre de commande ou de terminal.
– Création et manipulation de tableaux numpy
- Créer un tableau numpy en utilisant la fonction « np.array() ».
- Accéder aux éléments d’un tableau numpy en utilisant des indices.
- Modifier les éléments d’un tableau numpy en utilisant des indices.
- Utiliser des fonctions numpy pour effectuer des opérations sur des tableaux numpy.
4- Introduction à pandas
– Qu’est-ce que pandas ?
- pandas est une bibliothèque Python pour l’analyse de données.
- pandas fournit des types de données et des fonctions pour la manipulation et l’analyse de données.
- pandas est utilisé pour la manipulation de séries et de tableaux de données.
Installation de pandas
- pandas est inclus dans la plupart des distributions Python, y compris Anaconda.
- Pour installer pandas avec pip, tapez « pip install pandas » dans la fenêtre de commande ou de terminal.

Création et manipulation de séries et de tableaux de données pandas
- Créer une série pandas en utilisant la fonction « pd.Series() ».
- Accéder aux éléments d’une série pandas en utilisant des indices.
- Modifier les éléments d’une série pandas en utilisant des indices.
- Créer un tableau de données pandas en utilisant la fonction « pd.DataFrame() ».
- Accéder aux éléments d’un tableau de données pandas en utilisant des indices.
- Modifier les éléments d’un tableau de données pandas en utilisant des indices.
- Utiliser des fonctions pandas pour effectuer des opérations sur des séries et des tableaux de données pandas.
Nous avons vu comment installer Numpy et Panda, puis les codes à utiliser pour bénéficier des fonctions.
Préférence personnelle : je préfère utiliser Jupyter notebook depuis Anaconda, car je le trouve plus simple et plus ergonomique, facile accessible aux débutant.
Si vous voulez commencer assez facilement, je vous invite aussi à télécharger Anaconda et d’explorer les différents outils utilisant le langage python.

Il faudra maintenant s’exercer afin de se familiariser avec la manipulation de python.
Exercicez vous ! – Analyse de données simple avec Python
Objectif : Analyser un jeu de données simple en utilisant Python.
Données : Téléchargez le jeu de données « titanic.csv » à partir de https://www.kaggle.com/c/titanic/data.
Instructions :
- Importez les bibliothèques nécessaires : pandas, numpy et matplotlib.
- Chargez le jeu de données « titanic.csv » en utilisant la fonction « pd.read_csv() » de pandas.
- Affichez les 5 premières lignes du jeu de données en utilisant la fonction « head() » de pandas.
- Affichez le nombre de lignes et de colonnes du jeu de données en utilisant les fonctions « shape » et « size » de pandas.
- Affichez les noms des colonnes du jeu de données en utilisant la fonction « columns » de pandas.
- Affichez les types de données de chaque colonne en utilisant la fonction « dtypes » de pandas.
- Comptez le nombre de passagers par sexe en utilisant la fonction « groupby() » de pandas.
- Calculez la moyenne de l’âge par sexe en utilisant la fonction « groupby() » et « mean() » de pandas.
- Créez un histogramme de l’âge en utilisant la fonction « hist() » de matplotlib.
- Créez un diagramme en barres du nombre de passagers par classe en utilisant la fonction « bar() » de matplotlib.
- Enregistrez les résultats de votre analyse dans un fichier Jupyter Notebook ou dans un fichier Python.
Conseils :
- Utilisez les fonctions « help() » et « ? » pour obtenir de l’aide sur les fonctions et les méthodes de pandas, numpy et matplotlib.
- Utilisez les fonctions « isnull() » et « dropna() » pour gérer les valeurs manquantes dans le jeu de données.
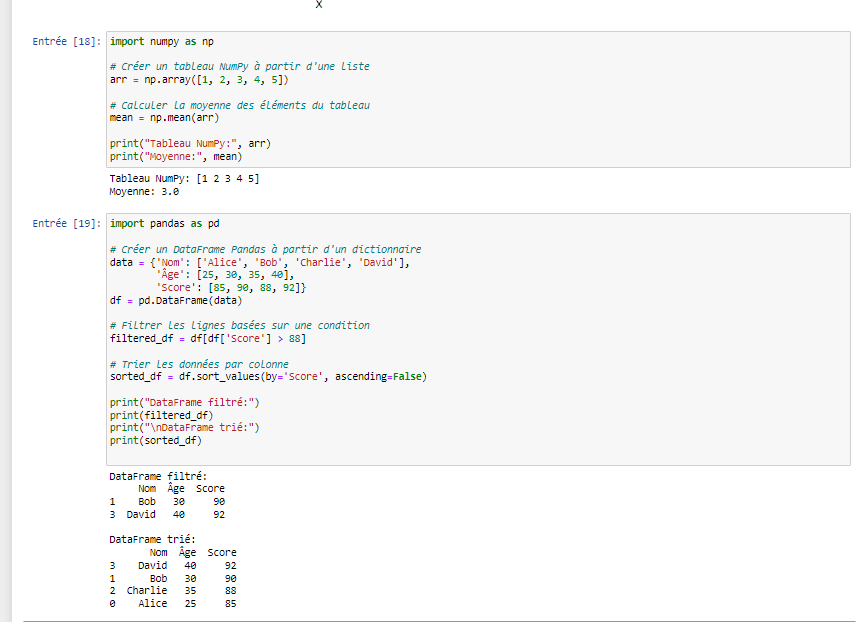
- Utilisez les fonctions « astype() » et « map() » pour modifier les types de données et les valeurs des colonnes.Voici des codes générés avec Numpy et Panda, ainsi que leurs resultats de données :

Bonne chance et amusez-vous bien avec votre exercice d’analyse de données simple avec Python !
Installing and configuring the Python environment
In this tutorial, we’ll guide you through the steps involved in installing and configuring the Python environment on your computer. We’ll cover the two most common operating systems: Windows and macOS.
In reality, you have 2 possible choices: either install Python directly and use Visual Studio (Section 1) or download Anaconda and use the Jupyter tools (Section 2 – my preferred mode).
I’ll leave you with these 2 possibilities so that you can explore the basics of Python and see how it can be installed and used.
Section 1: Installing Python
Installation on Windows
- Go to the official Python website at https://www.python.org/.
- Click on the “Download Python” button to download the latest version of Python.
- Double-click on the downloaded file to launch the installation.
- Select “Add Python 3.x to PATH” and click “Install now”.
Installation on macOS
- Go to the official Python website at https://www.python.org/.
- Click on the “Download Python” button to download the latest version of Python.
- Double-click on the downloaded file to launch the installation.
- Drag the Python icon into the “Applications” folder.
Section 2: Setting up the Python environment
Configuration on Windows
- Open the command prompt by searching for “cmd” in the Start menu.

2. Type « python » in the command window to verify that Python is installed correctly.

3. Install the pip package manager by typing « python -m ensurepip » in the command window.

4.install the Visual Studio Code editor by going to https://code.visualstudio.com/ and clicking on “Download”.

5.install the Python extension for Visual Studio Code by clicking on “Extensions” in the left-hand menu and searching for “Python”.
Configuration on macOS.
- Open Terminal by searching for “Terminal” in Spotlight.
- Type “python3” in the Terminal window to check that Python is correctly installed.
- Install the pip package manager by typing “sudo easy_install pip” in the terminal window.
- Install the Visual Studio Code editor by going to https://code.visualstudio.com/ and clicking on “Download”.
- Install the Python extension for Visual Studio Code by clicking on “Extensions” in the left-hand menu and searching for “Python”.
- Conclusion: Congratulations, you’ve successfully installed and configured the Python environment on your computer. You’re now ready to start coding in Python!
Section 2: An even simpler interface that I recommend installing for coding in Python ( and accessible to beginnersà: Anaconda.
1. Download the installer: Go to the official Anaconda website at https://www.anaconda.com/products/distribution.
- Version selection: Download the appropriate version of Anaconda for your operating system. For Windows, you can choose between 64-bit and 32-bit versions.
- Running the installer: Once the download is complete, double-click on the downloaded file to start the installation.
- Accept terms: Follow the on-screen instructions to accept the terms of the license agreement.
- Choose installation directory: Choose the Anaconda installation directory, or leave it as is (default).
- Configure options: You can choose to add Anaconda to the Windows PATH and associate .py files with Anaconda if you wish.
- Installation: Click on the “Install” button to start the installation. This may take a few minutes.
- Finish installation: Once installation is complete, you’ll see a confirmation screen. Click “Next” to finish.
- Installation verification: Open a command prompt (cmd) and type conda –version to verify that Conda has been successfully installed.
Steps for installation on macOS and Linux
The steps are similar to those for Windows, but you need to download the appropriate version for macOS or Linux from the official Anaconda website.
Using Anaconda
Once you’ve installed Anaconda, you can launch the Anaconda Navigator application to explore and manage the environments, packages and applications available.
- Launching Anaconda Navigator: Search for “Anaconda Navigator” in the start menu (on Windows) or launch it from Terminal (on macOS or Linux).
- Exploring environments: In Anaconda Navigator, you can create, clone, delete and manage virtual environments for your projects.
- Installing packages: You can install new Python or R packages from the “Environments” tab in Anaconda Navigator, or using the command line with Conda or pip.
- Launching Jupyter Notebook: Anaconda includes Jupyter Notebook, an interactive environment for executing Python code and displaying visualizations. You can launch it from the “Home” tab in Anaconda Navigator.
Start coding with Anaconda and Jupyter :
To go to Python with Anaconda : use Jupyter notebook or JyputerLab .
– On Jupyterlab: you’ll immediately find the Python console to start installing Panda, Numpy or Matplotlib and coding:

– On Jupyter Notebook: Click on NEW then on Python 3 (Ipykernel), and then you are ready to install your packages and to code:
3 – Introduction to pandas and numpy
Section 1: Introduction to numpy
– What is numpy?
- numpy is a Python library for numerical computation.
- numpy provides data types and functions for efficient numerical computation.
- numpy is used to manipulate multidimensional arrays.
– Installing numpy
- numpy is included in most Python distributions, including Anaconda.
- To install numpy with pip, type “pip install numpy” in the command or terminal window.

–
Creating and manipulating numpy arrays
- Create a numpy array using the “np.array()” function .
- Access the elements of a numpy array using indices.
- Modify the elements of a numpy array using indices.
- Use numpy functions to perform operations on numpy arrays.
4- Introduction to pandas
– What is pandas?
- pandas is a Python library for data analysis.
- pandas provides data types and functions for data manipulation and analysis.
- pandas is used to manipulate data series and tables.
Installing pandas
- pandas is included in most Python distributions, including Anaconda.
- To install pandas with pip, type « pip install pandas ” in the command or terminal window.

Creating and manipulating Pandas data series and tables
- Create a Pandas series using the “pd.Series()” function .
- Access elements of a pandas series using indices.
- Modify elements of a pandas series using indices.
- Create a pandas data array using the “pd.DataFrame()” function .
- Access the elements of a pandas data array using indices.
- Modify elements of a Pandas data array using indices.
- Use Pandas functions to perform operations on series and arrays of Pandas data.
We have seen how to install Numpy and Panda, then the codes to use to benefit from the functions.
Personal preference: I prefer to use Jupyter notebook from Anaconda, as I find it simpler and more ergonomic, easily accessible to beginners.
If you’d like to get started fairly easily, I’d also recommend downloading Anaconda and exploring the various tools using the Python language.

Now it’s time to get hands-on with Python.
Get practicing! – Simple data analysis with Python
Objective: Analyze a simple dataset using Python.
Data: Download the “titanic.csv” dataset from https://www.kaggle.com/c/titanic/data.
Instructions:
- Import the necessary libraries: pandas, numpy and matplotlib.
- Load the “titanic.csv” dataset using the pandas “pd.read_csv()” function.
- Display the first 5 rows of the dataset using pandas’ “head()” function.
- Display the number of rows and columns in the dataset using pandas’ “shape” and “size” functions.
- Display the names of the columns in the dataset using pandas’ “columns” function.
- Display the data types for each column using pandas’ “dtypes” function.
- Count the number of passengers by gender using pandas’ “groupby()” function.
- Calculate the average age by gender using pandas’ “groupby()” and “mean()” functions.
- Create an age histogram using matplotlib’s “hist()” function.
- Create a bar chart of the number of passengers per class using matplotlib’s “bar()” function.
- Save the results of your analysis in a Jupyter Notebook or Python file.
Tips :
- Use the “help()” and “?” functions to get help on pandas, numpy and matplotlib functions and methods.
- Use the “isnull()” and “dropna()” functions to handle missing values in the dataset.
- Use the “astype()” and “map()” functions to modify data types and column values.Here’s some code generated with Numpy and Panda, along with their data results:

Good luck and have fun with your simple data analysis exercise with Python!

